Lab 1: Introduction to R
GEOG-364 - Spatial Analysis
GEOG-364 - Spatial Analysis
Welcome to Lab 1!
Introduction
This lab builds directly on what you covered in Homework 1 on DataCamp. The goal is to get comfortable using R and R-Markdown, and to learn how some of the key pieces fit together. In Lab 2, we will explore similar ideas but with spatial data
In this lab, you will learn how to
- Set up an R-Studio Project
- Create & edit a R-Markdown document
- Install and use Libraries
- Load data
- Create summary statistics for different types of data
- Explore how GEOG-464 labs are structured and what you need to submit
You are allowed to use your own laptops, Posit-Cloud or the lab computers (very slow) to complete this lab.
How much time should this lab take?
Click here
This is a one-week lab. You’ll likely finish most of it
during your lab session, with about 4 additional hours of work at home.
So you can expect it to take around 6 hours total.
If it’s taking much longer than that, please reach
out! Don’t struggle in silence.
What do I need to submit? When is it due?
Click
here
Submission instructions and a checklist-style grading rubric are included at the end of this lab.
Your deadline depends on which lab section you’re in::
- Tuesday Lab: due Wednesday, Sept 10 @ 11:59PM
- Thursday Lab: due Friday, Sept 12 @ 11:59PM
- Friday Lab: due Saturday, Sept 13 @ 11:59PM
IIf something comes up and you’re running late, don’t panic — click this link for the late policy.
Can I use ChatGPT? Other questions?
Click here
Please read the the lab FAQ for guidance on using tools like ChatGPT and answers to common questions. We will also be talking about ChatGPT in the next week or so.
I’m stuck!
Click here to find out how to get help
If you get stuck, here’s how to find help:
DURING LABS
- Kiely (and often Dr G) will be available during your lab session. This is the fastest way to get help.
DURING OFFICE HOURS
- Dr G holds weekly office hours and genuinely enjoys helping with R — especially if you’re feeling stuck, frustrated, or overwhelmed.
PIAZZA DISCUSSION BOARD
- The Class Piazza discussion board is open 24/7. Kiely will explain how it works and will check it at least once a day.
LAST RESORT (IF NO REPLY ON PIAZZA)
- If you’ve posted on Piazza and don’t get a reply within 24 hours, you can send a Canvas message to Kiely or Dr G. Or reach out anytime if you feel completely lost. Replies usually take about 24 hours (see the late policy if you’re near a deadline).
Before You Begin
IF YOU HAVEN’T COMPLETED HOMEWORK 1, GO AND DO IT
NOW!
This lab builds on Homework 1, so it’s important
you complete it first. Click
here to go to the homework.
I have extended the
deadline just this once because it’s an important starting point for
your labs.
Getting Started
A. Open R-Studio/Posit-Cloud
- If you are using your own computer or the lab desktop, open the R-STUDIO icon not the one that says R.
- If you are planning to use posit cloud online, go here and log in - https://posit.cloud/content/yours
B. Set up a project for Lab 1
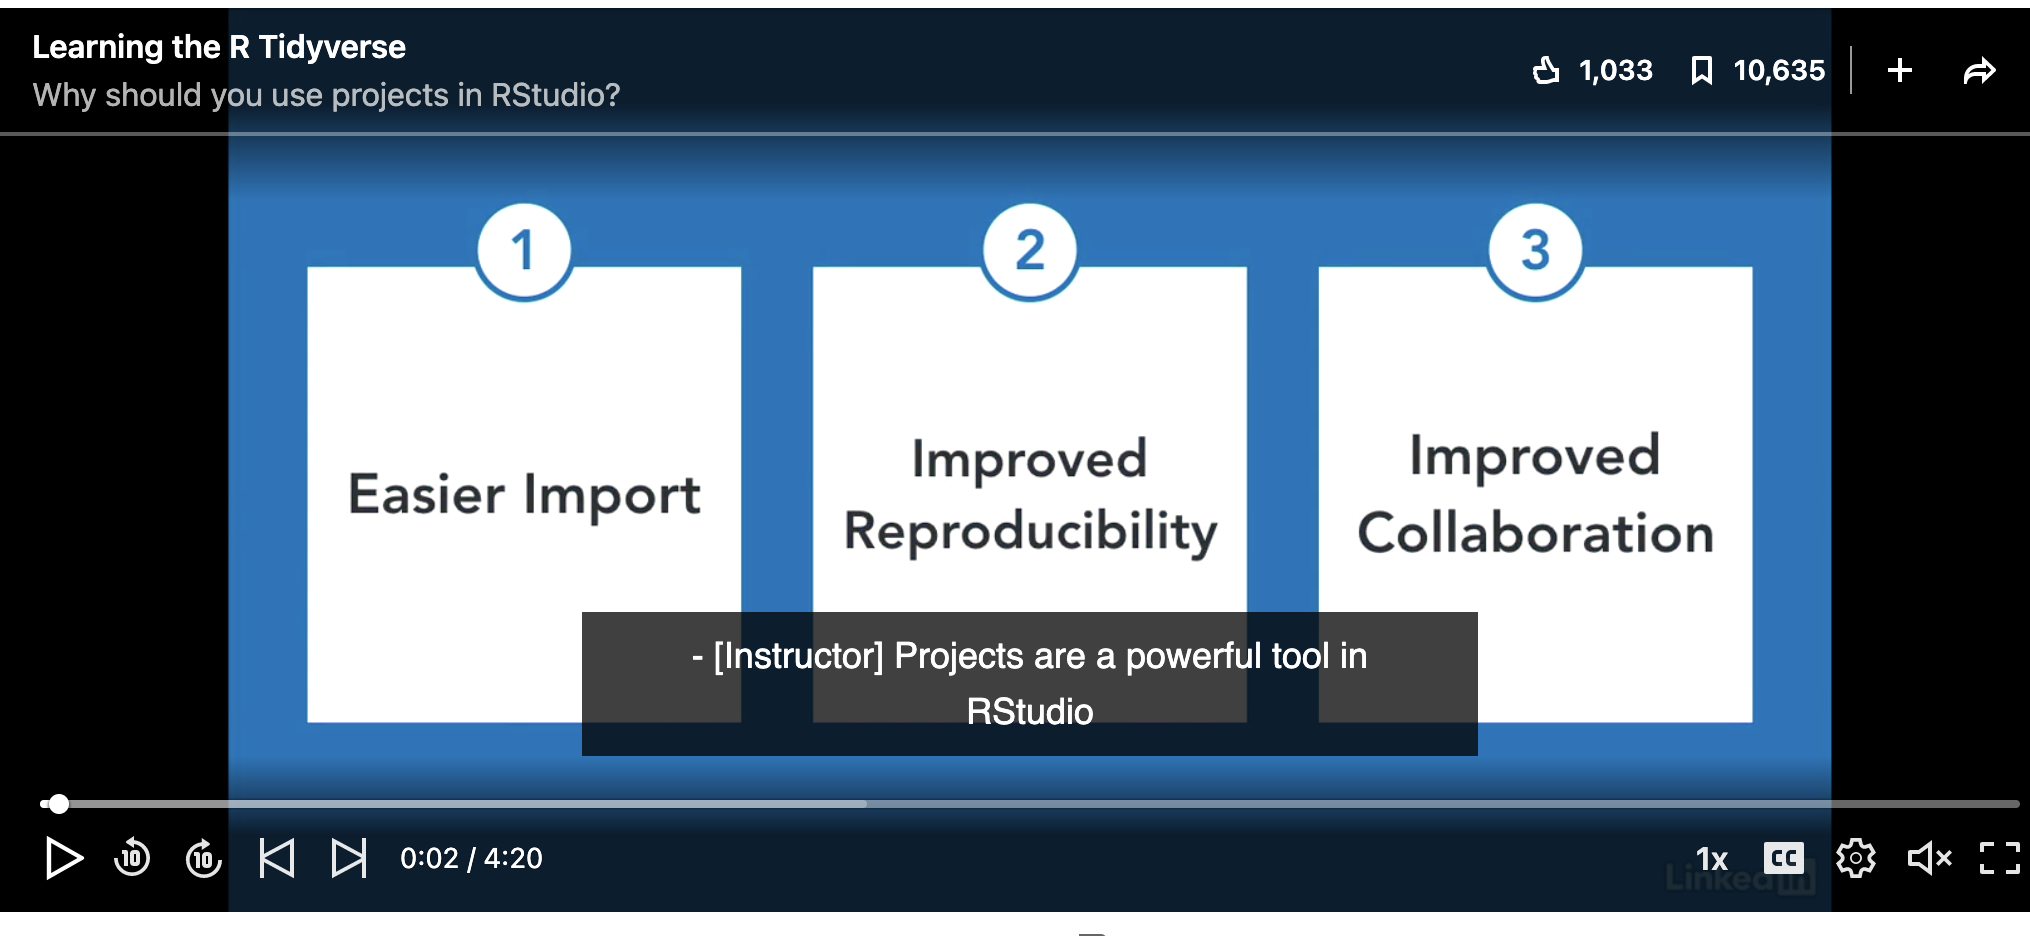
An R Project is like a home base for all the files, scripts, and data connected to one piece of work. Instead of saving files in lots of different places and then struggling to tell R where to look, the Project keeps everything together. Here’s why projects are so useful:
Consistency across computers: If you move from Posit Cloud to a lab computer or your own laptop, you only need to copy the Project folder. Open it, and everything inside will still “know where it lives.”
No messy file paths: You won’t have to keep typing or updating long folder names. R will automatically treat your Project folder as the starting point.
Everything is organised: Each lab, assignment, or project has its own container, so your work never gets tangled.
Easy to share or back up: You can zip up the folder, send it, or store it in GitHub/OneDrive, and it will still work when reopened.
Watch this video to find out more:
- You need to create a new project for every single lab!
Today, use these instructions to create a project for Lab 1:
If you are using your own computer or a lab computer, click here Tutorial: R-Studio Desktop
If you are using posit cloud online (the website), click here Tutorial: Posit Cloud online
C. Global settings
Before you start using RStudio, it helps to adjust a few settings to make your lives easier.
- Click here Tutorial: Global settings and follow the instructions to change your global settings & appearance.
D. Packages (the R App store)
Just like the factory settings on your phone are pretty boring, in R we often want to download/install apps to do specific commands. In R, we call apps packages or libraries.
To download new packages
Go to the Packages Tab. The list you see are the ones currently installed on your computer (like the calculator is pre-installed on your phone).
Now, Click the INSTALL button. This takes you to the app store where you can type the name of a package you want to download.
- Search for and install the following packages/apps.** -
tidyverse-plotly-palmerpenguins-ggstatsplot-readxl
Just like you don’t need to go to the App store every time you want to open instagram, you only need to do this ONCE for each package. (on posit cloud it might happen more often). The install commands should never be in your lab report.
If you need more help, see here Tutorial: Packages)
E. R-Markdown & your lab script
You are going to write up your labs as R-Markdown files (ones ending in .Rmd). These can include both code and text - and they are easy to turn into websites, pdf documents, presentations and many other things.
- First, learn more about R-Markdown.
a) Go to https://rmarkdown.rstudio.com/index.html and take a look around at what R-Markdown is and what it can do
b) Go to the R-Markdown Tutorial and read the introduction & R-Markdown structure.
YOU SHOULD BE RUNNING YOUR PROJECT AT THIS POINT. MAKE SURE IT SAYS LAB-1 AT THE TOP OF YOUR SCREEN.
- For this lab, you are going to use a pre-existing R-Markdown file,
where I have put in some simple questions for you to answer.
Click here to download the file into your project folder. If this link doesn’t work, then go to Canvas Lab 1 and you can download the .Rmd file from there.
IF YOU ARE ON POSIT-CLOUD, first download it to your computer/desktop. THEN follow these instructions to upload it into your Lab 1 workspace: https://docs.posit.co/cloud/guide/data/
Complete the lab script
Rename the file
“GEOG364_Lab1_AddYourEmailID.Rmd” should now be in your Lab 1 project folder (either on your computer or on posit-cloud).
In R-Studio, look at the Files Tab to the next to Projects/Help in one quadrant. If you are running your Lab 1 you should be able to see it. Click the tick-box next to it and click the Rename button. Change AddYourEmailID to your PSU email ID e.g. mine is hlg5155.Open the file & follow the instructions!. Come back here at the end.
Above and Beyond
- Attempt above and beyond! See below for more details.
Reminder: An A is 94%. You can skip this section and still earn an A.
At the very end of your lab script there is a section called “Show me something new.” This is a space for you to explore and show off something beyond the required questions.
How it is marked:
2/4 points for any genuine attempt at something new.
4/4 points if what you try is especially creative or well explained in your own words
Important: You must explain in your own words what you did and why, not just paste in code or screenshots.
Why this matters:
The idea is simple: R and RStudio can do much more than what fits in a single lab. If you find the lab easy, this gives you a way to stretch yourself (100% is hard to get!). Equally, if you struggled with an earlier section, this is a chance to earn back some points.
So this section is a chance for you to:
- Try out something that caught your interest, even if it wasn’t in the instructions.
- Go a step further on a question you already answered.
- Experiment with features, packages, or commands we haven’t covered yet.
- Be curious! Discover new features I don’t know about!
Examples of “something new”:
- Install a custom RStudio theme (see RStudio Themes) and include a screenshot.
- Create an extra plot of a variable from the starwars dataset and interpret it in one or two sentences. (check out plotly)
- Install and try something from a fun package that you find
- Try a command you found online (e.g. how to sort rows, or calculate an average for one column, or many others) and explain what it does.
Can I use ChatGPT?
Please don’t just copy/paste ChatGPT code. The whole point of this is to stretch your knowledge of R in a low-stakes way. You can use it in the same way you would talk to a friend e.g. to bounce ideas off or help you fix something that isn’t working. But know that I will value something smaller that’s clearly yours and explained in your own words, over something very fancy that you copy/pasted from AI.
Submitting your Lab
Remember to save your work throughout and to spell check! (next to the save button). Now, press the knit button one final time.
You will be submitting TWO FILES. Your RmD file and the html website you made. Keep reading for how to find them.

Click here if you’re using R-Desktop
Press knit. If you have not made any mistakes in the code then R should create a html file in your lab 1 folder which includes your answers.
- If you look at your lab 1 folder on your computer, you should see the .Rmd and .html file in there — complete with a very recent time-stamp (see the figure above).
- Double click on the .html file. This will open it in your web browser. CHECK THAT THIS IS WHAT YOU WANT TO SUBMIT.
- Finally, go to Canvas and submit BOTH your .html and your .Rmd file in the Lab 1 Assignment.
Click here if you’re using Posit-Cloud
Look at the Files tab (next to Projects/Help in one quadrant). You will see a list of files: one with the file type .Rmd (your code) and one with .html (the website you made when you pressed knit). Look at the red circle in the pic below.

- Click the check-box to the left of the .Rmd file.
- Look just above at the Files quadrant settings menu. Click the blue “more” cogwheel icon (see diagram). You might need to make RStudio full screen to see it — it cuts off if the window is too small.
- Double click on the .html file. This will open it in your web browser. CHECK THAT THIS IS WHAT YOU WANT TO SUBMIT.
- Click Export. This will download the file.
- REPEAT FOR THE HTML FILE (you can do them together but it exports as a zip).
- Finally, go to Canvas and submit BOTH your .html and your .Rmd file in the Lab 1 Assignment.
Grading rubric
Overall rubric
Overall, here is what your lab should correspond to:
| Grade | % Mark | Rubric |
|---|---|---|
| A* | 98-100 | Exceptional. Not only was it near perfect, but the graders learned something. THIS IS HARD TO GET. |
| NA | 96+ | You went above and beyond |
| A | 93+: | Everything asked for with high quality. Class example |
| A- | 90+ | The odd minor mistake, All code done but not written up in full sentences etc. A little less care |
| B+ | 87+ | More minor mistakes. Things like missing units, getting the odd question wrong, no workings shown |
| B | 83+ | Solid work but the odd larger mistake or missing answer. Completely misinterpreted something, that type of thing |
| B- | 80+ | Starting to miss entire/questions sections, or multiple larger mistakes. Still a solid attempt. |
| C+ | 77+ | You made a good effort and did some things well, but there were a lot of problems. (e.g. you wrote up the text well, but messed up the code) |
| C | 70+ | It’s clear you tried and learned something. Just attending labs will get you this much as we can help you get to this stage |
| D | 60+ | You attempt the lab and submit something. Not clear you put in much effort or you had real issues |
| F | 0+ | Didn’t submit, or incredibly limited attempt. |
And.. finished!